Reference guide for DIY Mist n Go 2 Fan Package by HydroMist
Posted by HydroMist on Dec 3rd 2024

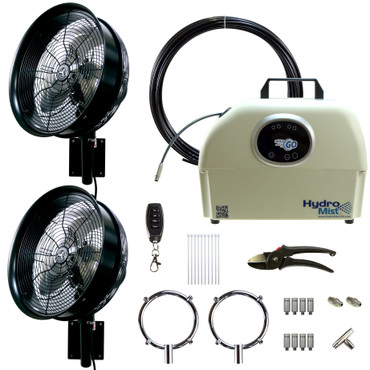
Unpacking: Each master carton contains two 14” inch fans with wall bracket and covers, one Mist n Go pump with remote and one package containing 2 4 inch rings, 8 Nozzles, 1/4 “tube fittings, 50 ft of black tubing and cutter. The fans and pump will each have their own manual. The pump will have oil already in it. Please see individual manuals on care and maintenance.
Fan Placement: It is important to install the fans in an area that gives the most cooling coverage plus it is aesthetically pleasing. Optimal height is 8 ft from the top of the wall mount however each job has unique situations that may require the fan to be installed anywhere from 6 to 10 ft. The system comes with 50 ft of tubing that will need to be cut to the desired length the fans span plus the distance to the pump. If more hose is required, you can order on Hydromistusa.com. You will want to ensure that you’re close to a power source. If need be, you can use an outdoor rated extension cord to utilize a power outlet outside of the area. This is often used to connect the fans to a universal third party remote or smart device as well so both fans can be turned on/off at same time. Installation instructions are provided with each fan.
Attaching Rings to Fans: Prior to installing the fans you will need to screw the ¼ “male fitting (fitting with white plumbers’ tape) into the ring and attach the rings to the fan. Make sure the fitting is screwed in tight but don’t overtighten. It may require two wrenches. The plumber’s tape will seal the connection to prevent drips. Once the fitting is attached, insert the neck of the ring into the area open for the tubing and snap the ring around the holds on the fan guard. Zip clips can be used to help secure the ring and keep it from vibrating. At this time, you can punch out the cap at the bottom of the fan shroud where the tubing will be inserted later. Do not put the nozzles in at this time.
Pump Placement: You will need to connect the pumps water source using a standard garden hose or washer hose (not included) and power to standard 110 V outlet. It is best to place the pump in an area free from foot traffic and outdoor weather, especially direct sunlight. Most people will place on pavers or other hard surface within 10 feet from the hose bib or any outdoor covered area close to the space of cooling. Please keep in mind that you will need to turn on the mist at the pump or use the remote so putting the pump in garage or further away from the space being cooled may be inconvenient. Do not place the pump in attics or crawl spaces.
Connecting the System: Once you have the pump in place and connect to power and water source and the fans mounted with rings attached to them you are ready to connect the system’s water supply. To make for a clean install you want to plan the best way to conceal the ¼ black tubing. To do this you can attach the tubing to existing areas hidden such as the backside of a gutter, trim or existing conduit. Using zip strips or hose clamps (not included) You will also need to determine where to split the hose with the ¼” Tee fitting. It is often easier to connect the Tee fitting up high and split the tubing directly to each fan. To connect the tubing to the fitting simply push the tubing as far as it will go. It may take a bit of force to ensure it is inserted all the way. Do the same with the pump connection. Compression fittings simply work by inserting the tubing into the fitting until one cannot push any further. The teeth of the fitting will grip the tubing, and it is connected. Make sure you measure correctly as these fittings are not made to come apart once the hose is inserted. Please Note: The tubing, fittings and nozzles are rated for 1000 PSI and is needed for system to operate properly with all HydroMist systems. Tubing can be painted or placed underground. Conduit is recommended in areas subject to freezing.
Purging the system: Once the system water line is hooked up and powered, we recommend purging the line before installing the nozzles. This will prevent any debris in the tubing from clogging the system. Please be aware when you turn the system on without nozzles it will shoot water so make sure to protect anything you may not want to get wet. Once the system runs for a few seconds, turn off the pump and insert the nozzles and hand-tighten. Turn the pump on and look for leaks. If you see drips, turn the system off and push tubing harder into the fitting and/or tighten nozzle in the ring. This should stop the drips, and your system should be ready to go. You can run the fans at any time with or without mist. Adjust the fan tilt and speed to your desire

 Wishlists
 Log In / Sign Up